Control
The essence of pitching is control. The pitcher holds the ball more than any other player. This gives the pitcher control of the game’s tempo. The pitcher controls when the pitch is thrown, where the pitch is thrown, how fast the pitch moves, how the ball is spinning (and the several aspects of that), and where the ball first can be seen by the batter. To do all these things well the pitcher also must control his own mind. This is the hardest part of course.
The pitcher is always under pressure. Sometimes the pressure is obvious to everyone but whether he is thinking of it or not the pitcher is certainly aware of it. Every pitch holds the potential for embarrassment. Every pitch could hurt the batter or be hit hard right back at the pitcher. Therefore, oddly enough, don’t worry about putting your pitcher under more pressure. He already is probably feeling about all the pressure he can feel.
Your problem as a coach is to help your pitcher think right. You need to get the right thoughts going through the pitcher’s mind. Saying such things as “throw strikes” will not help at all. The pitcher is already trying to throw strikes. If you don’t have anything to tell him that will help him, just yell encouragement.
The key to the pitchers’ mind control is knowing what to remember and practicing remembering it as vividly as possible. Yes, there is an element of self-hypnosis here. But this kind of self-hypnosis is the ability to concentrate, to block out distracting influences. It will be useful to them the rest of their lives so they might as well start learning to control it now.
Much of what follows has to do with what thoughts should be in the pitcher’s mind. The descriptions of what to do with his body are descriptions of goals, objectives for the body, that are used to teach them what proper execution feels like.
Why is a Baseball Hard to Hit Hard?
The ball is a moving target. The batter must predict where the ball will be and when it will be there and then swing the bat so that the bat will be there too. All sorts of things can go wrong and prevent the meeting of the bat and ball.
In general the further from the batter the ball is, the harder it is to swing the bat through the spot where the ball will be. Also the less time the bat will spend in the path of the ball since the ball will only cross a little of the bat’s path during the swing.
All throws curve, if only due to gravity. The batter expects the ball to curve in a certain way. If it curves some other way the batter is “fooled” and will hit the ball only by accident. For example, when facing a pitcher with an unusually fast pitch, the batter will expect the ball to curve down faster than it actually does and will tend to swing under the ball. On the other hand, when the pitch is slower than expected, the ball drops sooner than the batter expects and he tends to swing over the ball.
If the pitch is rather close to the batter’s body, it can be hit fair only with the bat handle which is narrow. It is harder to hit the ball with the narrow part of the bat than the fat part. The narrow part of the bat is also traveling slowly in comparison with the fat part of the bat.
Therefore, if the pitch is either far from the batter or close to the batter and coming at an unexpected speed and curving in an unexpected way the batter will find it very difficult to hit the ball.
The pitcher has 8 teammates who will be happy to help get the batter out. Therefore if the pitcher prevents the batter from hitting the ball hard when the ball is hit, that will probably be enough to get the batter out.
To hit the ball hard the batter must hit the ball with the bat’s “sweet spot.” That is out on the “fat” part of the bat. If the ball hits the bat away from the “sweet spot” much of the energy of the collision will be converted to vibration in the bat. That vibration does not make the ball go anywhere. It is wasted energy. Thus if the pitcher can keep the batter from hitting the ball on the sweet spot most of his job is done.
Pitches close to the batter’s hands will be too close for the batter to hit on the sweet spot without hitting the ball foul. Pitches far away from the batter will be further from the batter than they can reach with the sweet spot. If the batter gets far from the plate or near to the plate they make different parts of the strike zone “safe” for the pitcher to throw pitches through knowing the batter will not be able to hit that pitch with the “sweet spot.”
Therefore, The two best places to throw pitches to a batter are low and outside (but still in the strike zone of course), and high and inside (at the hands). If a pitcher has sufficient control to throw all their pitches in those two spots, they can be very effective even if they cannot throw the ball very fast.
Location is the most important thing for the pitcher to control since that can prevent the bane of 11-12 year old pitchers which is the walk. The second most important thing for the pitcher to be able to control is the speed of the pitch. A pitcher with only one speed of pitch is only a thrower not a pitcher. A pitcher needs to have control of a fast pitch and a slow pitch. At the high school level the slow pitch should be about 15% slower than the fast pitch. At the 11-12 year old level the pitching rubber is much closer to home plate and the 15% slower pitch is just a batting practice fastball. To be effective the slow pitch must be 30-35% slower than the fast pitch. Since gravity is also making that slow a pitch curve pretty quickly it will have the additional virtue of an unexpected curve.
The third most important thing for the pitcher to control is the way the ball spins. The spin causes all the curve movement that gravity does not impart unless you have a really strong cross wind. The spin affects how the ball looks as well as how it moves. The appearance (pink or white) has only a slight affect on the batter. After the ball gets dirty the batter can’t see the difference anyway.
Mound Mechanics
There are all sorts of rules that cover things a pitcher may do and must not do. You should get a book of the rules of baseball (they come in paperback and are not expensive) and study these rules. A pitcher needs to know many of these rules but since the rules are incorporated into the directions for how to pitch if the pitcher does the things they are told here they will not violate the rules.
The rubber is the centerpiece of the infield and is the focus of most of what I call “mound mechanics.” There are right ways to touch the rubber (“get on the rubber”) and right ways to stop touching the rubber (“get off the rubber”). (I expressed the above sentence in terms of touching since when the pitcher works from the stretch he doesn’t actually have either foot on top of the pitching rubber, just right next to it.) The pitcher should never touch or stop touching the rubber casually.
Getting on the Rubber
As a prerequisite for getting on the rubber the pitcher must hold the baseball. It is a balk to be on or near the rubber without the baseball unless fielding a batted or thrown ball. Therefore the pitcher must be holding the ball. Some pitchers prefer to hold the ball in their glove at this point. Some prefer to hold the ball in their throwing hand. I prefer the throwing hand. Since I do not allow my players to use the hidden ball trick (too embarrassing for the player caught off base), I have no desire to hide the ball from the rest of the players. Also, the pitcher can throw the ball to a base quicker if the ball is already in the throwing hand.
With ball in hand, the pitcher may stand over (straddling) or beside (first base side for a right handed pitcher) the rubber. The pitcher’s hands must be apart. There is no way to avoid a balk other than stepping off the rubber if the pitcher’s hands are together when they step on the rubber. The pitcher should then place the foot of the throwing shoulder (right foot for a right handed pitcher) against the home plate side of the pitching rubber and parallel to it. We will call this foot the back foot. There will be a hole in front of the rubber since the pitchers feet dig a hole there after a little use. The pitcher may fill in this hole or dig it deeper if they like when time is out. Then, the other foot is brought to a position parallel to the rubber and the back foot a little more than shoulder with from the back foot. This is the foot position for pitching from the stretch.
It is always legal for the pitcher to pitch from the stretch. Since pitchers often have to pitch from the stretch or give the runners a free pass to third base, I always begin teaching pitching from the stretch position. Later they can learn pitching from a full windup if they like.
At this point the pitcher must pause and look toward the catcher for a sign. While taking the sign the pitcher’s hands must be separate. The catcher need not give a sign but the pitcher must pause at this point to look for one anyway. This pause prevents the “quick pitch” intended to catch the runners without a lead and the batter while not prepared to hit.
In this position the pitcher’s hands are still apart, the feet have not moved but the pitcher can make any other movement of head, arms, and body that does not suggest a throw to first base in the opinion of the umpire. (Obviously if there are no runner’s on base the umpire is unlikely to call a balk of any kind.) Having “taken the catcher’s sign” the pitcher will bring the hands together. This may be part of a “stretch” or movement of the hands over the head. During this stretch motion the pitcher may move the front foot. This move of the front foot must be the same each time the pitcher stretches or it may be the basis of calling a balk.
Once the hands are together they may be moved as a smooth continuation of the stretch motion to any position so long as they stay together. Having reached that position the pitcher must pause for at least one “count.” (A count is roughly half a second but this is an “umpire’s judgment” as to how long is necessary so don’t bother arguing about it.) Only the pitcher’s head may move during this pause. Any discernible movement by any part of the pitcher’s body, arms, or legs during the pause may be grounds for calling a balk. Any movement which is considered by the umpire to be part of the pitcher’s normal delivery of a pitch home requires that the pitcher throw the ball to the catcher. There may not be any stops and starts in that delivery. It must be a smooth, continuous motion.
With a runner on first, if the pitcher makes any movement that, to the umpire, could be part of a throw to first, the pitcher must throw the ball to the first baseman as part of a smooth, continuous throw. Therefore, any rotation of the shoulders as when the pitcher turns their head to look at the runner on first requires a throw to first without stopping that rotation. Any movement of the front foot toward first by a right handed pitcher requires that the pitcher throw to first. The pitcher may not “fake” a throw to first.
Getting Off the Rubber
There is one and only one way to get off the rubber without throwing or beginning to throw the ball. The pitcher must move the foot which is on the rubber off the rubber toward second base and drop their hands to their sides. Once the foot has moved to the ground behind the rubber and the hands have gone down the pitcher is just another infielder and can do about anything they want. With ball in hand, it is impossible for the pitcher to balk when not on the rubber.
The pitcher, with runners on base, may throw to any occupied base with their foot coming off the rubber as part of the throwing motion. In the case of second and third, the pitcher can begin a throw to those bases when occupied and step off the rubber as part of that throwing motion. The pitcher is not required to actually complete the throw to second and third. However, if, in the judgement of the umpire, the pitcher began a throw to second or third in order to deceive a runner at first into moving further off base and the pitcher then throws to first in a pickoff attempt, the umpire may call a balk.
The pitcher may not throw to an unoccupied base from the rubber.
The pitcher may get off the rubber by pitching to the batter. In the course of a normal pitching motion the back foot comes off the rubber. This is legal and expected.
The pitcher should get off the rubber quickly whenever something unusual happens. If the crowd begins to yell a runner may be going to the next base. There may be a dog in the outfield. A frisbee or kite may be settling to earth behind the pitcher. In any event, the pitcher’s concentration has been broken and they should start over from off the rubber.
Pick Off Moves
Once the pitcher is on the mound near the rubber, any throw to get out a runner will be considered a pickoff move. The throw to pick off a runner may be done at any time in the pitchers routine until they do something that commits them to a pitch to home. Thus, at any time during or before the pause after the stretch, the pitcher may throw to a base.
There are certain times that are particularly good for throwing to a base. The most promising is during the stretch itself. Most runners are completing their leads and are about as far off base as they will ever get. They are likely to be in motion away from their base and thus will have momentum to overcome in getting back. Pitchers rarely throw to first as part of the stretch. The pitcher’s hands are high so the throwing hand is close to where it needs to be to throw.
Another good time is when the pitcher hears the coach say something to the runner, especially if the coach is upset. The runner will often look at the coach and thus not see the throw that gets them out.
If there are runners at first and third, the runner at first is more likely to be careless and be expecting to steal.
Moves to First
There are three basic moves to first. The slowest is to step off the rubber and throw. This move also risks being called a balk if the pitchers hands go up into throwing position while they are stepping off the rubber toward second. I do not recommend even teaching this one.
The second and quickest of the moves to first is the jump turn and throw. This is the most popular or at least most frequently used move to first by the major league pitchers. The pitcher merely lifts their feet and moves them so they are lined up toward first. That is if you draw a straight line through both ankles it would, if extended far enough, go to first base. The upper body is rotating so the shoulders will be above the feet while the throwing hand moves into position behind the pitcher’s ear. The throw is made as soon as possible. In order for the pitcher to get their spikes out of the ground, a slight jump of maybe an inch or two is used. The move of the left foot and right foot is simultaneous. The arrangement of the feet constitutes the required step toward first which must precede any throw there from the rubber. (Note, this move is a way to get off the rubber.) The throw can be pretty hard since the body is rotating to help the throwing arm.
The third move is slower than the jump turn but has an element of deception in it. This move I call the “direct step to first” move. The pitcher simply moves the front foot directly toward first base, steps, and throws. The left knee does not rise. Lifting the left knee is part of the normal motion to home and thus requires that the pitcher throw home (for a right handed pitcher). The pitcher should lean back toward first a little just before moving the front foot toward first. This makes the step quicker. The move is deceptive if the runner is using the left foot movement as the queue to start toward second. There is about a fifth of a second during which the foot is moving but otherwise the pitcher seems motionless (because the pitcher is falling directly toward the runner and has not yet begun to rotate the body). This may cause the runner who is expecting to steal on this pitch to start toward second. If the timing is right, the runner will realize their error after their motion toward second has begun but before they get any significant velocity toward second. The pitcher wants the runner to try to get back to the base rather than getting them at second. The move’s effectiveness comes in making the runner’s return to first slow.
Moves to Second
One of the nice things about moves to second is that the pitcher does not have to throw the ball. Also, it is easy to look at second without rotating the shoulders. In addition, a step directly toward second from the set position starts just like a pitch to home so the runner cannot tell when the front foot comes up whether the pitcher is going to throw home or to second. This delays their start toward third.
The bad thing about moves toward second is that they are so slow. The pitcher, whether right or left handed, must rotate a full 180 degrees to make the throw. If they rotate that 180 degrees in the direction of their glove hand side, they must take their eyes off the target right before they throw. If they rotate toward their bare hand side, they are moving the throwing shoulder away from the target. Either way slows the throw to second. Since the second baseman and shortstop normally are not stationed at second base, they must move to cover the base. Sometimes the pitcher must wait briefly for them to look at the pitcher since they are looking where they are going or avoiding bumping the runner.
With players of this age, the center fielder is usually relatively close behind second so the risk of throwing to second is reduced. On the other hand, if the ball gets past the center fielder the runner should score.
All things considered, I usually recommend not throwing to second very often but having the pitcher raise the front knee and pivot toward second frequently. This drastically reduces the steals of third and keeps the runner from getting a long secondary lead while the ball is on its way to the plate.
Moves to Third
For right handed pitchers, the move to third is just like the left hander’s move to first (which will be discussed below). The skill comes in the head movement of the pitcher to “sell” the move as a pitch home. The movement of the head should be exactly the same for a throw to third as it is for a pitch. That is, the pitcher looks at the runner at third, looks home, and throws home. The timing of the look to third and then home should be consistent. The time between the look home and lifting the front foot should be consistent. The only difference comes when the front foot goes toward third. Then, and only then does the head turn back to third during the throw.
There is also the “snap throw” move to third. This is done by stepping off the rubber the usual way and throwing to third without any additional moving of either foot. This move requires a strong arm to have any chance because only the arm is throwing. There is no movement of the shoulders. Also, there is the risk that the hands will go up into throwing position instead of down and the move will be called a balk.
Throwing to third is pointless if the runner at third is doing a good job of running bases since they will be very cautious about leaving the base early. With only a two step lead they do not even have to dive to get back safely. Therefore, only when the runner is very aggressive should the pitcher try a move to third.
Moves for Lefties
The left handed pitcher, like the left handed batter has all sorts of advantages (presumably to make up for living in a right handed world. 🙂 ) They are looking right at the runner on first. They can pick up that front foot and let it hang without the runner or anyone else knowing where they are going to throw the ball. This requires a smaller lead at first and a later start in stealing second. They must be careful to keep the hanging foot from crossing the line of the rubber (toward second) for that will commit the pitcher to throw home. So long as the hanging foot stays between the rubber and home plate the pitcher can throw to either first or home. They don’t even have to decide where they are going to throw until after the foot has hung there a while. The pause, if any, after the knee is raised should be brief since the motion to throw home or to first must be continuous. If prolonged, the pitcher also risks losing his balance.
If the left handed pitcher uses this hanging foot move they need to picture just what they are going to do if the runner on first starts toward second. This prevents changing their mind after their body has started a move toward home.
The same technique described above for the snap throw to third by right handers will work to first with left handers with the same risk of a balk call.
The main thing the left handed pitcher must beware of is stepping toward home on a throw to first. They must put that front foot closer to first than to home plate on the stride. Second, when making a pick off move to first they must go ahead and throw to first when the runner takes off for second as their foot comes up.
Catcher Aids
The catcher is the pitcher’s best source of help when there are runners on base. Since it is often distracting for the pitcher to look at the runners especially the runner on first for a right handed pitcher, the catcher can assume this responsibility by signaling when the pitcher should throw to a base. There need not be a signal for second but for a right handed pitcher there needs to be a signal for making a quick move to first and for a left handed pitcher for a throw to third.
The catcher should also point at any problem such as a runner just taking off for the next base without waiting for the pitcher to begin their throw home. When the catcher points the pitcher must step off the rubber and then look where the catcher is pointing.
On true pickoff moves to second the catcher can signal the fielder covering second when to start over to cover. The pitcher sees the same signal but pauses a half second and then does a jump turn to throw to second if the fielder has a lead in getting to the base.
The catcher signaling pickoff moves to first for right handed pitchers is the most useful since it it the most common situation and since it lets the pitcher concentrate on pitching. Sometimes the pitcher should throw to first without a signal from the catcher. This will help prevent stealing the catcher’s sign.
The catcher also needs a “hurry up” signal for use when the runner does not have a big enough lead yet. This is especially good for a runner on second since they are often late in getting their leads. Also, if the shortstop has bluffed them into going back toward second this signal lets the pitcher know to throw before they can get their full lead again.
The use of the catcher in this way means that the infield does not have to place someone right at second base to hold that runner on.
The Mechanics of the Pitch
Things to Avoid
Throwing sidearm is bad for several reasons. The most important reason is that it can hurt the pitchers arm to try to throw hard sidearm. If you extend your arm straight out to the side and use your finger tips to push hard on a door frame you will cause pain in your elbow. When the arm is straight the elbow is very weak. Tennis players who hit forehands with a straight arm get “tennis elbow” and young pitchers who throw sidearm with a straight arm get “little leaguer elbow.” If you now bend the arm you have extended 10 degrees and push again with your finger tips on the door frame you will notice that you can push much harder and without pain. If the elbow is bent it a much stronger joint.
Sidearm throwing also greatly limits how fast the pitcher can throw because it limits the shoulder turn and follow-through. See below for how it does so.
When a person throws, the throwing shoulder is like the handle of a whip. If the shoulder stops suddenly, the arm is put under considerable stress. The stress comes from the arm going suddenly from bent to straight. If you hold your elbow straight in front of you with the arm fully bent and then, keeping the elbow in place straighten your arm quickly you will “pop” your elbow. This is a form of hyper-extension. When the pitcher stops the shoulder suddenly, the hand continues toward the target straightening the arm at high speed. This sudden straightening hyper-extends the elbow. Therefore the shoulder must continue in a smooth arc through the throw.
The most common way of stopping the shoulder suddenly is a consequence of the pitcher’s stride toward home. If the front leg lands straight and stays straight or lands bent a little and straightens, that forces the upper body to stop the shoulder while the pitcher’s shoulders are still square to the catcher. Rather than getting a full 180 degree rotation of the shoulders the rotation is stopped after only 90 degrees. The only way the hand can continue to push the ball toward home once the shoulders stop square is to straighten quickly.
If the pitcher’s back remains vertical, the only possible rotation of the shoulders is in the horizontal plane. This reduces the distance traveled by the throwing shoulder to about half of what it could be. Few youth pitchers bend their backs into the throw because they keep their backs vertical. If they were to bend at the waist with the back straight it would force the shoulder to follow a path that curves in two dimensions rather than the smooth simple arc that is best. This prevents most of the follow-through. It also reduces the time available for accelerating the ball. Perhaps worst of all it makes control very difficult.
If the pitcher’s fingers come down the side of the ball similar to the way a quarterback’s fingers move down the side of a football to impart the tight spiral, the baseball will have an axis of spin parallel to the line of flight. This prevents the spin from making the ball curve. Only gravity and wind will move the ball from a straight line path. This kind of spin is OK for a fielder (though not the best) but it is bad for a pitcher because the path of the ball is so predictable.
The Stride
The pitcher will need a long stride toward home on the pitch. The stride needs to be long to get the most acceleration of the throwing shoulder toward home. A long stride puts the release point of the ball closer to the plate which makes the pitch’s effective speed greater. The long stride also helps the follow-through.
The pitcher will have to lift their front foot at the beginning of the pitching motion in order to stride toward home. Some pitchers bring the knee rather high and many kick the foot out toward third (or first if left handed). The high knee tends to slow the pitcher and throw them off balance. It is also a considerable waste of energy. A leg kick also wastes energy.
The knee of the front leg should not be raised higher than the waist so the upper leg never goes above horizontal. This is plenty of lift to allow the pitcher to take a long stride. The lower leg should just hang there. It just goes along for the ride until it reaches out toward home on the stride.
The front foot should strike the ground first with the ball of the foot. To do this requires that the knee be bent or the heel will strike first. You want the front leg bent so that it can serve as a shock absorber and ease the pitcher into the full bow from the waist that completes the throw.
The front foot should strike the ground at a 45 degree angle to the direction of the stride. If the foot strikes the ground parallel to the rubber the hips cannot fully rotate when turning the shoulders. If the foot strikes the ground with the toes pointing at the target the hips will have been forced to rotate at least 20 degrees or so before the shoulders should begin their rotation. This is often called opening up too soon. Both errors reduce rotation and make it harder to maintain good form throughout the throw.
At the end of the throw the front leg should be bent 90 degrees and the pitcher’s chest almost to the knee. The throwing shoulder should extend beyond the knee in the direction of the target. Unless the ball of the foot strikes first, the leg will tend to be straight and remain straight with the problems described above in the “don’t do that” section.
The length of the stride controls how high the pitch goes. A short stride causes a higher pitch. A longer stride causes a lower pitch. The pitcher should change only the length of the stride to raise or lower pitches. Taking a long stride is a considerable exertion. When the pitcher gets tired it becomes harder to get a full stride and pitches will tend to be high more often. This is also why pitchers need strong legs and why the professional pitchers spend so much time running.
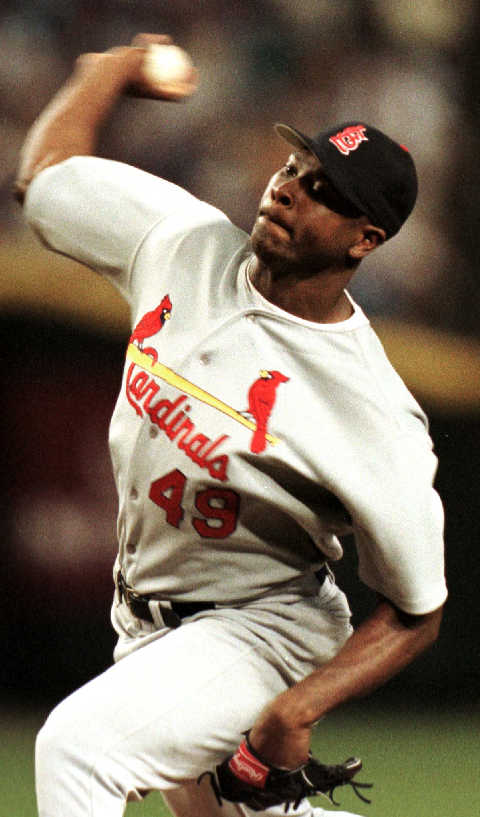
Note the length of the stride, the hips have not rotated, the arm is extended toward second with the palm of the hand toward second, the front shoulder is pointed at the target, the front knee is bent and the front foot is parallel to the ground. Unfortunately, you can see that his front foot is not at 45 degrees but 90 degrees and his hips have already started to open up. His shoulders are still closed imparting a “torque” on his torso. If he uses that torque to add power to his shoulder rotation he can get a little more speed on the pitch. This requires great body control.
The horizontal changes in the direction of the pitch should be controlled only by the direction of the stride. Moving the stride an inch or so to left or right should change the spot the pitch hits on the catcher by up to a foot. (It’s geometry. Work it out for yourself.) Once the pitcher has learned their motion well they will use only their stride to adjust where the pitch goes because every other part of the motion is constant from pitch to pitch.
Like the batter, the pitcher must use the front foot to provide much of the push for rotating the hips. The back leg does not push since by the time the hips begin rotation the back foot is being dragged along the ground. The velocity toward home comes from falling off that back leg toward the plate. Therefore the faster the body is moving toward home, the faster the shoulders (torso) can rotate. The further the body falls before the front leg starts pushing back the faster it will be going. This is part of why tall pitchers can, in general, throw harder than short pitchers. It is also why a long stride gives greater force to the throw and why the “crow hop” is used by outfielders to throw really hard.
The Shoulder turn
Since the throwing shoulder is the “whip handle” its movement is the most important part of a good motion. If the shoulder movement is correct, then almost everything else must be working correctly.
The throwing shoulder should move in a great arc. That arc should be in a single plane. The plane will be tilted at anywhere from 30 to 80 degrees above the horizontal. If the pitcher’s back remains vertical the plane will be horizontal. Therefore, to tilt the plane the pitcher must arch their back somewhat so that the throwing shoulder will be low when it is toward second base, rise as the body rotates until it reaches its apex just as the shoulders are square to the plate, and then fall almost to the pitcher’s front knee in the follow-through. When the throwing shoulder is highest the other shoulder should be low. The glove hand shoulder begins high, drops sharply as the throwing shoulder rises, then goes down more slowly as the body bends at the waist.

Note the arch here is more than most pitchers use. Also, the arch must be continued through the throw, just at the beginning of the throw. You can see from his feet that the back leg cannot be pushing and the hips have only begun to rotate. Thus the back leg cannot be pushing at this point.
As the throwing motion begins the throwing shoulder is farther from the target and the glove shoulder is nearer the target. During the throw, the shoulders swap places.
Note how low the glove side shoulder is and how high the throwing shoulder is. Note the arch in the back is maintained through the throw. The hips have fully rotated in the time it took to bring the hand from straight toward second to near the head. Notice that the upper arm is level with the shoulders and not above them. The forearm is only about 20 degrees from being in line with the upper arm. This gives a lot of leverage while maintaining the strong elbow angle. The front knee is bent at almost 90 degrees.
The strength or speed of the shoulder turn is the most important factor in the potential speed of the pitcher’s fastball. If the pitcher wants to throw a faster pitch, the effort should go into moving the shoulder faster. To see the relative unimportance of the arm strength try allowing your arm to hang loose from the shoulder. Keep the arm and shoulder completely relaxed. While the arm dangles, use the rest of the body to come set and move as if you were throwing a fast pitch. You will find the relaxed arm flying in a great arc as such speed that your fingers will tingle from the increase in blood pressure. Note that your hand has moved this fast with no arm or shoulder muscle doing any work at all. You will also note that there is no stress on the arm bones or tendons from that “dangle throw” because the arm remains relaxed. It is just “going along for the ride.”
The Arm
The arm should be able to make a full, sweeping motion throughout the throw. There should be no sudden starts and stops. Especially there should be nothing jerky about the throw. The arm needs a smooth, powerful acceleration until the ball is released. Then it needs a smooth deceleration. It must be able to continue in its arc of motion so the hand goes below the knee.
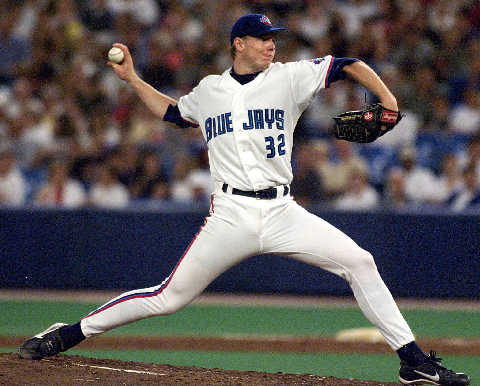
As the arm brings the ball back behind the body the arm should gradually straighten until it is extended toward second base. At this point the palm should be toward second. (See the first picture above.) As the shoulder rotates the wrist will not need to twist since when the shoulder points toward home plate, the palm will face that way also. Many players will bring the ball up toward their ear rather than straightening the arm toward second. This gives them only a short distance to push the ball before they must release it. Also, the more bent the arm, the closer the hand is to the shoulder and thus the slower the hand will be going because of the shorter radius of the arc of the hand’s motion.
If the arm is completely straight during the throw the player will be throwing the ball as if it were a hand grenade. The elbow needs to be bent some so that the arm strength will be able to add its push to the shoulder’s rotation. If the arm is completely straight, the elbow is too weak to transmit much push to the ball. If the arm is bent about 30-45 degrees, the throw will be what is called a “three-quarter overhand” pitch. If the arm is bent nearer 90 degrees, the pitch will be called “overhand.” Since the arm with the overhand throw is nearer the shoulder, the overhand throw cannot be quite as fast as the three-quarter overhand throw.
The arc of the throw made by the hand can be very nearly vertical even if the pitcher is using the three-quarter overhand throw. The arching of the back rotates the arc toward the vertical. The greater the arch the more upright the arc. This means that the spin on the ball can have a horizontal axis even if the pitcher is not throwing overhand.
The Hand
The hand can speed the ball on its way by a “wrist snap,” with the same motion one uses in waving “bye-bye.” The muscles of the wrist are very weak at best. If your young players never master the wrist snap they will lose almost nothing from the speed of their pitches. Try putting your wrist against some immovable surface (like the post of the dugout door) so the arm cannot contribute to the throw and see how far you can throw the ball with just the wrist snap. Since the rest of the motion must be good before the wrist snap helps at all, the chances are good that your pitchers will not develop their motion to the point that you should try to teach it.
The hand and its orientation as the pitch is thrown determines the spin on the ball. The ball’s spin is the third most important factor in making a pitch hard to hit.
If the fingers come down the back of the ball (the part furthest from home plate) the pitch will have backspin. Backspin makes the ball sail or float and therefore fall more slowly that expected. This is what a good fastball does.
If the ball rolls over the middle finger on its way home, the ball will have top spin. This will cause the ball to drop more quickly than expected. This is what a “sinker” or “drop” pitch does.
The finger (either the index finger or middle finger) can push on the side of the ball (beside the center of the ball, not above it) and this will produce a vertical axis of spin and a curve to one side or the other. This is what many boys think of as a curve because it is easy to see this movement when catching such a throw.
The middle finger can also press down on the side of the ball as it is thrown which causes the ball to spiral like a football. This is call a “gopher ball” or hanging curve since it does just what the batter expects.
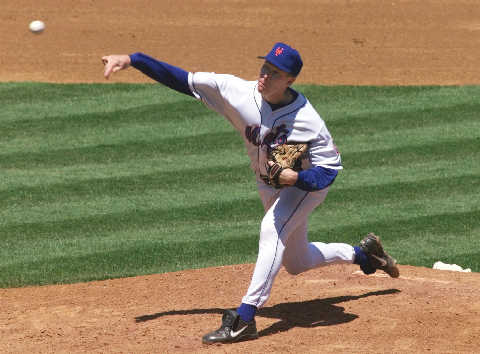
Note the fingers on this pitcher’s throwing hand. They have been throwing a fastball. You can see that they have moved straight down the back of the ball thus generating backspin. Note that the arm is almost, but not quite, straight. You want the arm to remain a little bent all through the throw. Note also the pitcher’s other good mechanics. There is the bent front knee, the sloping shoulders with the throwing shoulder high, and the fully rotated hips.
Each of the above pitches and several change-ups will be described below.
Control Pitching
Just like your TV has a horizontal hold and a vertical hold, your pitchers must know how to control the location of their pitches horizontally and vertically. This can only be done after they have developed a good throwing motion. If their motion is consistent, they will be consistently high or low or inside or outside. The pitches will “cluster.” If the pitcher’s motion is poor, their wildness will not show a pattern.
The first part of control for the young pitcher to master is getting the pitch on line. If the arc of the pitcher’s throw is on line to the target, then no matter where in that arc the ball is released, the pitch must go over the plate. If the pitcher’s arm is dropping down so that the arc is nearly horizontal then the release point will have to be precise in order for the ball to be on line. Therefore, the first thing to look for if the pitcher is having control problems is the plane of the arc in their throw. If the arc is not nearly vertical you look for the explanation. Are they throwing side arm? Are they putting a slight arch in their back as they reach back toward second and keeping it there as they bring the ball forward? Are they following through to below the knee or finishing above the waist. Are they bowing toward the target?
If the arc is good then check where they are are striding. Some pitchers do not stride to the same spot each time. If their stride is not directly toward the plate, they will not be able to consistently pitch on line.
Adjusting pitches up or down is done by shortening or lengthening the stride. Shorter strides make higher pitches.
If the pitcher is wild, work on their motion in practice. If the pitcher is having control problems in a game, remind them of their motion and how to think about it. Remind them of what it feels like when their motion is good. Yelling things like “just throw strikes” will not help at all. They are already trying to throw strikes.
Curves
The Sinker
What is known as a “curve” is a pitch that has some spin other than backspin with a horizontal axis. Backspin with a horizontal axis is the spin of a fastball. If we make the axis of spin vertical, the pitch moves to one side or the other. If we put top spin on the ball it drops faster than expected.
To put top spin on the ball we must either push the top half of the ball toward the plate, or pull the bottom of the ball back toward second, or both. If you hold the ball in your hand and twist the wrist so the thumb goes from bottom to top of the ball, you will put top spin on the ball. If you do this really hard, you will hurt your arm. You will feel pain in your elbow and perhaps in the wrist. If your players try to put that twist of the wrist into action to give the ball top spin they will injure their arms. All pitches should be thrown with a fixed wrist position.
To give the ball top spin without a wrist twist one grips the ball in the palm of the hand. The middle finger is on a seam and is wrapped around the ball. As the throwing hand comes forward, the index finger is lifted as if one were pointing at the target. This gets it out of the way. The thumb is on the top side of the hand with the palm vertical. The middle finger is horizontal as the ball is released by the thumb. The ball then “rolls” over the middle finger. The middle finger slows the bottom of the ball giving the desired topspin.
Most of the effectiveness of this pitch comes from its slow speed. The spin of the ball is not great and the distance from the pitching rubber to home for this age players is not far enough for the ball to drop very much below the expected path. If the pitcher is good there may be a two-three inch difference in the height of the ball when it reaches the strike zone given the trajectory of the ball as it leaves the pitcher’s hand. This is more than enough to generate a weakly hit ground ball against a good hitter. Against a weak hitter it is asking for trouble. Weak hitters tend to loop their swing and swing late anyway. This pitch should be used only on good hitters. It is not a strike out pitch.
Side Curve
When you spin a top, the axis of rotation of the top is vertical. If you want a pitch to curve to the side you must also have the axis of rotation be vertical. This means that the side of the ball must be pushed toward the batter. If you push the third base side of the ball it will move away from a right handed batter. If you push the first base side it will move toward a right handed batter.
The easiest way to throw this pitch is to hold the ball on the finger tips just like throwing a fastball. As the hand comes over the the top in the throwing motion the palm of the hand faces the batter, just like a fastball. The difference is that only the middle finger is in contact with the ball. Since the middle finger should be off center (some young pitchers turn their throwing hand so the middle finger is in the center of the ball which just makes a weak fastball) the pressure on the ball is on the side of the ball. Also, the finger can move toward home much faster than the center of the ball does. This imparts the spin around a vertical axis that makes the ball curve.
There are two ways to keep the index finger from pushing on the ball, too. The simplest is to just lift the index finger off the ball as the throw is made. Some players have trouble doing this since it means pushing hard with one finger and lifting the one right next to it. That brings us to the second method. This method is sometimes called the “nickel curve” because it is easy to throw but doesn’t “break” very much. In this case the index finger is curled so that the knuckle nearest the finger tip rests against the ball. This pushes the ball a little away from the palm (which is good in this case) and prevents it from being able to push on the ball.
Please note that to generate a spin with a vertical axis the pressure point on the ball must be horizontal with the ball’s center. If the middle finger is above the center of the ball by 45 degrees as the pressure is applied and is pushing down rather than toward the plate, the ball will spin like a football and the ball will not curve at all to the side. To prevent this, have the pitcher keep the wrist bent back a little as the arm comes forward. This bending or flexing is the same kind you would see if the arm were lying flat on a table with the hand palm down and the hand were lifted. If you hold a baseball in your hand as if throwing a fastball, then lift the index finger, you can see that flexing your wrist in this fashion lowers the tip of the middle finger with respect to the center of the ball.
Another reason why the middle finger may be pushing down on the ball is that the ball may be back in the palm allowing the middle finger to wrap around the ball as if throwing a sinker. There should be enough room between the ball and the palm to insert a pencil between them.
In “aiming” the pitch, I throw the pitch at a spot 4-6 inches to the right (I am right handed) of where I want the ball to go. Since my subconscious is being instructed to throw a fastball and only the “feel” of the ball in the hand is different, this “aiming to the right” compensates for the off-center push and the spin of the ball. Naturally, the “aiming” is visualizing the ball going there while I remember how it feels to throw the ball properly.
The side to side curve is the least effective movement of the ball for purposes of getting the batter out unless the pitcher has exceptional control of the pitch. The bat is a lot longer than it is thick and for the batter to misjudge where the ball will be by 2-3 inches horizontally will just move where the ball hits the bat. Therefore, if the pitcher has a good back arch and an overhand motion, they can tilt the axis of rotation so that it is no longer vertical but is still perpendicular to the ball’s line of flight. This results in a pitch which both moves from side to side and also drops somewhat. That is a much more effective combination than a simple side to side motion of the ball.
Change-ups
Perhaps the most effective pitch a young player can throw is the changeup. The good hitters in your league will be used to seeing fastballs most of the time. It will take several slow pitches in a row for them to adjust to the slower speed and different arc. The changeup should be thrown only to good hitters because the weak hitters usually cannot hit a fastball fair and when they do hit it fair it is not hit hard.
The change-up should be thrown with the same pitching motion and arm speed as the fastball. However, even when the batter knows it is coming the pitch will usually be effective. I have had successful pitchers who threw nothing else.
When pitching from a rubber 60 feet 6 inches from home the change-up should be about 15% slower than the fastball. When pitching from closer than that the pitch should be correspondingly slower. Thus, for a pitching rubber 45 feet from home as one has in the Babe Ruth League and Little League the pitch should be 30% slower or more. If the rubber is 48 feet from home as is the case for the Pony League’s Broncos (11-12 year olds) the pitch should be at least 25% slower than the fastball. A good change-up should start out looking like it will be a pitch at the top of the strike zone. It should, at some point in its arc be higher than the batter’s head. It should also strike the ground just in front of the catcher unless the catcher catches it with the mitt palm up. The change-up should always be low and outside in the strike zone. At this distance from the batter the effects of mistiming the swing are maximized.
There are two big problems with throwing the change-up. The first is that pitchers at this age practice it so little they usually do not have good control when throwing it. The second is that their change-ups are usually too fast. They become just weak fastballs when thrown too fast.
To address the first problem I ask my pitchers to warm up throwing the change-up. The arm speed should be just like the fastball and the body motion the same so the pitcher can warm up just as well throwing change-ups as fastballs.
The problem of speed is much more difficult to solve. The only way to make the change-up slow while keeping the same hand and arm speed as in throwing the fastball is to let the ball slide through the fingers somehow while the arm is coming forward at high speed. The simplest way to do this is to hold the ball in the palm of the hand and throw it like a loosely held spear. The ball will slide back between the thumb and index finger as the hand comes forward. This reduces the speed greatly but is difficult to learn to control quickly.
A second way is to use the knuckle-ball grip. In this case both the middle and index fingers are curled so that only the tip of each finger touches the ball and the fingernail is perpendicular to the surface of the ball. The ball is held down in the palm and the fingers are extended as the pitch is thrown. This produces a true knuckle-ball in that the ball does not spin when the pitch is thrown right. Since your players hands will be too small to throw this pitch right, the ball will spin somewhat and will not “break” like a true knuckle-ball would. It will be quite a bit slower than a fastball which is what you want. This pitch is usually easier to control for the pitchers who can throw it at all than the “loose-grip” change-up described above. But it does require a pretty large hand.
A third slow pitch is an extreme form of a “cut” fastball. Only one side of the ball is gripped using the thumb and index finger. Half the ball will be sticking out to the side of the hand when properly held. The throwing hand will have the palm toward the batter as the pitch is thrown and the index finger will slide down the side of the ball giving it a lot of spin but little velocity. The ball is not held on the finger tips like the side to side curve since we do not care whether it curves or not. Being closer to the palm, the pitch will be slower than the side to side curve. The main risk with this pitch is that the ball will slip out of the pitcher’s hand and go wild (like straight up). After the pitcher has thrown it for a few days such slips should be quite rare.
The last change-up I will describe is often called the “circle” change-up because the thumb and index finger form a circle in gripping the ball. This pitch is probably the easiest to control right from the first. Its defect is that it can be thrown to fast. The ball is placed in the palm of the hand with the thumb and index finger forming a circle. The circle forces the ball toward the little finger which is able to grip the ball with the middle and ring fingers. Thus the ball has three fingers that will push it toward the plate. Since two of these fingers are weak and the ball is in the palm, the ball will not go nearly as fast as the fastball. To further reduce the speed of the ball just move it further out toward the little finger. The further out you go the slower the pitch and the harder it is to control. The pitcher can also “cut” the pitch to the middle finger side of the ball which will slow it further and give a spin the reverse of the side to side curve. Naturally, this also makes it harder to throw accurately.
Probably the best change-up is a good sinker curve. If your pitcher can control that pitch and has a good fastball (not great, just good) they can get almost any batter they face out. The problem is control, since the pitch should be in the low outside corner of the strike zone.
The circle change-up can be used right on through high school with adjustments made to throw the faster versions as the pitching distance increases. If it were easier to throw slowly it would the the obvious change-up of choice. Given the variety of pitchers and the importance of practicing the change-up, I would suggest that you work with your pitchers to find the version that each player likes best and have them use that one.
The change-up can be practiced alone since it should hit the ground in front of the catcher. All the pitcher needs is a home plate and a metal garbage can lid lying on the ground about 3-4 feet behind the plate. The idea is for the ball to go at least 5 feet high and land on the lid. If they can get a “clang” 6 out of 10 times they have a winning pitch.
Fielding the Position
As the ball leaves the pitcher’s fingers on the pitch, the pitcher becomes another fielder with the same responsibilities as any other fielder. Get the ball. Cover a base. Back up a base. Thus, the pitcher’s glove hand should be at their chest as the ball is delivered. The nearby glove is also the best protection from a line drive.
On ground balls the pitcher has priority over the first baseman if they get to the ball at about the same time. The pitcher gives way to the third baseman on ground balls. In both cases it is because the player with higher priority is going toward first while the other is moving away from first base. The one moving toward first will have an easier play there. If there is to be a play at third, the catcher is yelling “go to third,” then the pitcher gets priority. The play should never be at third if the ball is hit toward the right side of the infield.
On ground balls the pitcher catches cleanly the throw should be a firm one to make it easy to catch. Before the pitch is thrown the pitcher should be reminded where their play is to be. While the ball is on the way to the pitcher, the coach and catcher should be telling them where to throw it. The pitcher should not have to think, just listen.
The pitcher gives way to all the fielders except the catcher on popups. The pitcher should point at the ball on passed balls (wild pitches) and popups to help the catcher find the ball.
The pitcher should start toward the same side of the field as the ball is hit to. If the ball is hit to the right side the pitcher should expect to have to cover first base until they see that the first baseman is already there. On grounders to second the pitcher backs up first base. On grounders to third the pitcher covers third. On long hits, the pitcher serves as backup to third or home or as cutoff man if that is needed. The pitcher has to think on the long hits and go where needed. Since long hits give the pitcher time to think there should be no problem. Since most players do not think at all, the coach will need to yell instructions frequently. Always yell the player’s name and then tell them what to do. If you don’t you will not get their attention in time.
On bunts in which there is to be a play at the plate the pitcher must make an underhand toss. See the catcher section for a complete description of the underhand toss. A similar toss is made to first if the ball is more than half way to first when the pitcher gets to it.
The pitcher should not run directly toward first when covering on a right side grounder. The correct direction for the pitcher to run will take them to a point 10-15 feet down the line from first toward home. As they near the line they should curve to run just inside the line to the base. This prevents collisions with the batter and lets the pitcher face the player making the throw to them. If the throw is in good time the pitcher can catch the ball and then run across the base. If the throw is just in time, the pitcher will have to catch the ball while trying to step on the base. It is hoped that the pitcher will get to first as soon as possible so they can have a foot on or near the base when the ball is thrown. This makes catching and tagging easier.
When there are runners at first and third, the runner at first usually steals second. If the decision is made to try to get the runner at second, the pitcher should put up their glove as if to catch the throw from the catcher. This will make the runner at third wait until the ball is past the pitcher unless the catcher makes a high throw. Also, it the runner is running from third on the catcher’s throw, the pitcher can catch the ball and have a good chance to get the runner off third in a rundown.
When the catcher leaves home, the pitcher must cover the plate. They should do this without being told but they rarely do.
If a runner at third comes half way or so down the line with the pitch and stops to see what the catcher will do, the pitcher should go stand beside the runner to get the throw from the catcher. This almost guarantees a rundown.